Preparing Your Ceiling For Paint
Tools and Items You Will Need:
- Caulk Gun
- Hammer
- Knockdown knife
- Mud pan
- Utlilty knife
- Acrylic caulk
- Drywall compound
- Mesh tape
- Metal patching fabric
- Paper tape
- Utility light
Mud Basics
Most fixes require at least two coats of taping compound. Compound is too thick to use right out of the bucket so mix in small amounts of water until you get a smooth, mashed potato-like consistency. Use a slightly runnier mix for embedding paper tape. Let each coat dry completely (usually overnight) before applying another coat. If you have leftover ridges from tools, let them dry and scrape them off with a putty knife before adding the next coat. With the first coat, don’t worry about craters, scratches or other small flaws. Try to avoid large humps and make sure any patches are covered. The second coat is to fill in and smooth out any voids or low spots.
Generally, larger patches call for wider coats of drywall compound to mask them. Higher areas from patches or existing humps can be feathered out over wide areas so the wall will appear flatter. The most common mistake is to use narrow rather than wide swaths of compound over patches and humps. Strive for a thickness of 1/8 in. or so over the fix and feather the edges flush with the drywall. Sand all the fixes with 120-grit drywall sandpaper. Use a handheld sander for small jobs and a pole sander for big jobs. Check your work with the light again after sanding to look for areas that need more work. You can always add a third or even fourth coat of joint compound to fix any remaining problems.
Preparing Your Ceiling for Paint
- Find flaws with a utility light. To find the problems, inspect the entire wall surface by holding a utility light close to the wall and “raking” across the surface. The light will highlight wall flaws that aren’t obvious to the unaided eye. Circle each problem area with a pencil (not a pen or marker, which may bleed through paint later) to mark it for repair.
- Fill nail pops and small holes. Nail pops are usually caused by fasteners that are driven through the drywall paper during installation or by a gap between the drywall and the stud. Vibration and seasonal wood swelling and shrinkage cause the overlying filler to pop out from the wall. Drive in another 1-1/4-in. drywall screw near the nail pop so the head penetrates just below but not through the drywall paper. Remove the old screw by pushing the screw gun tip through the middle of the nail pop and backing out the screw. If it’s a drywall nail, drive it into the stud with a nail set and leave a concave dimple.
- Fill with drywall compound. Apply two coats of drywall compound over the new screw head and dimple. Sand lightly and prime before painting.
- Caulk cracks at inside corners. Hairline cracks at inside corners usually signal slight movement between adjoining walls. Choose any type of latex caulk and cut the tip just short enough to leave a 1/8 inch hole in the end. Squeeze a narrow line of caulk directly over the crack.
- Smooth the caulk. With a wet finger, mold the wet caulk into the corner to avoid unsightly build-ups. The caulk will remain flexible and keep the crack from reappearing. Avoid thick layers of caulk which may look too rounded in a square corner.
- Patch medium-size holes. Large holes still require old-fashioned fixes that include cutting out a square chunk of drywall around the hole, installing backing, adding a drywall patch and then taping the wound. Holes under 6 inches in diameter can be more easily repaired with a self-adhesive drywall patch. Select a size that’ll overlap the sides of the hole by at least 1 inch. Pick away any loose chunks of paper or gypsum that protrude above the surface. Peel off the backing and stick the patch in place.
- Apply drywall compound. Spread a wide, thin layer of mud over the patch and the surrounding wall. The thin metal patch is perforated so the mud can penetrate and lock it in place. After the first coat dries, spread a second layer of mud to fill in imperfections and low spots. Sand when dry.
- Nail, tape and mud cracked corners. If a metal corner bead is badly dented or damaged, pry it off and replace it by removing and reinstalling the base trim. If only the edges are popping through the surface or there’s a hairline crack along the flange, drive 1-1/4 inch drywall nails through any corner bead edges that are loose, using as many nails as needed to hold the flange flat to the wall.
- Tape the flanges. Center fiberglass mesh tape over the flange over the entire length of the corner bead. Spread two coats of joint compound over the mesh tape, using the corner of the bead as a guide for the taping knife. If you have a corner that’s in a vulnerable spot and constantly gets bumped, use setting compound for the first coat and regular joint compound for the second one. Setting compound is much tougher and won’t crack nearly as easily. Be careful to apply even coats that don’t project beyond the corner or leave humps or tool marks. Setting compound is very hard to sand.
- Cut out and replace loose tape. If the tape is blistering or lifting away from the wall, it’s because there wasn’t enough joint compound under the tape to anchor it to the drywall. The solution is to cut through the paint and joint compound and peel every bit of loose tape away from the wall to expose the surface behind. Be aggressive with this step, even cutting and peeling tape beyond the crack since there’s likely more poorly anchored tape that has yet to come loose.
- Fill the hole. After cutting loose material away, fill the hole with setting compound. Mix setting compound and fill the hole. Don’t overfill.
- Apply tape. After the compound hardens, apply a strip of paper tape immersed in taping compound a few inches beyond and directly over the patch. Then, overlay two wide swaths of tape immersed in regular drywall compound to blend the patch into the wall.
- Taper humped joints. Butt joints (where drywall joins at the ends) often have unsightly humps left from built-up and/or poorly feathered edges when the walls were originally taped. Repair by overlaying a wider layer of compound to blend the hump in with the surrounding wall. Apply the first layer of compound with a taping knife, working from the bottom to the top of the hump. Use a little more pressure on the knife edges on both sides of the hump to help feather (taper) the edges. Strive for an overall width of at least 2 feet for the patch.
- Smooth with a knockdown knife. Immediately after applying the first coat, drag a knockdown knife over the wet compound, smoothing the edges flat against the drywall. Don’t wait more than a few minutes or the rubber blade will drag in the mud and you’ll have poor results. Let dry. Smooth and apply a second, slightly wider and thinner coat using the same technique. Sand the patch and add more coats as needed to fill in low spots, craters or grooves. Use a utlity light to check your work.
- Carve out and fill joint cracks. Midwall cracks can be difficult to fix and may crack again. Cracks usually occur at the weakest points of the framing (corners of windows and doors). Seasonal movement or foundation shifting is makes these cracks especially visible if a drywall joint is in one of these areas. Repair by carving a 1/2″ x 1/2″ wide ‘Deep V’ in the center of the crack with a utlity knife. Fill the crack with setting compound and let it harden. Apply paper tape immersed in taping compound directly over the patch and overlay it with two or more wide layers of regular taping compound.
In some cases, the only remedy is to tear off the drywall and seam new pieces near the center of the opening. - Skim coat large damaged areas and smooth vertically. If there’s significant damage over a large area of drywall, cover the surface with a thin layer of joint compound to conceal the damaged area. Work in an area no larger than 4 x 4 feet.Prepare the wall by picking away loose edges of drywall facing paper. Prime the leftover raw paper with priming paint to seal the raw paper. Kilz is a great product to use because it seals well and dries fast. Dab at the wet paint with a foam brush or rag to saturate the paper and wipe away runs. Let the paint dry. Lightly sand away standing paper nubs. If you sand through the paint and expose fresh paper, paint again.
How to Paint New Drywall
- Trowel on the compound with overlapping vertical strokes. Make a series of overlapping vertical strokes with a knockdown knife to smooth out tool marks and fill in low spots.
- Smooth horizontally. Make a series of overlapping horizontal strokes with the knockdown knife. Work quickly so the thin coat of mud doesn’t begin to dry. If you did a good job of applying and smoothing the joint compound, you’ll only need one coat. But if after sanding the wall you find some uneven areas, trowel on more taping compound wherever needed to fill in problem spots and sand again.
Removing Popcorn Ceiling
Tools and Items You Will Need:
- Notched trowel
- Plastic drop cloths
- Utlity knife
- Painter’s tape
- File
- Garden pump sprayer
- Mud pan
- Hand sander
Test for Asbestos!
Any popcorn ceiling installed before 1980 might contain asbestos—a known cause of lung cancer. Before scraping any popcorn ceiling texture, contact your local health department and ask about getting a sample tested. If the test comes back positive, cover the popcorn with new drywall or tongue-and-groove planks, or hire an asbestos abatement contractor to remove popcorn ceiling.
Do a Scrape Test
Before prepping the room, try scraping a small area with a notched trowel. Try it dry first, then dampen the texture with water and try again. Some texture comes off easily without water, but in most cases wetting is best. If the water doesn’t soak in and soften the texture, the ceiling has probably been painted or paint was added to the texture mix. In that case, wetting the ceiling may not help and you’ll have to decide whether you want to tackle a really tough scraping job or choose another way to hide your popcorn ceiling.
Prep for a Big Mess
- Cover floors and walls with plastic drop cloths as you begin your popcorn ceiling removal project. Don’t use canvas drop cloths because water can soak through.
- Remove all furniture from the room you’ll be working in. If moving everything out of the room isn’t possible, gather all furniture together in one area and cover the area with drop cloths.
- Remove ceiling fixtures and fans. Leaving light fixtures and ceiling fans in place will only hinder your progress. Not only will fixtures be in your way, but they’ll become covered in wet popcorn and risk damage.
- Protect can lights from water spray. If you have recessed lights, stuff newspaper or rosin paper inside them to keep them dry. Also, make sure the power to those fixtures is turned off at the circuit breaker panel or fuse box.
- Cover electrical boxes. Shut off the power to any electrical junction boxes in the ceiling and cover them with painter’s tape to keep the wiring dry when spraying water on your popcorn ceiling. Overlap the sides of the junction box with the tape, and then trim around the perimeter with a utility knife, being careful not to nick the wires.
Removing Popcorn Ceiling
Before starting, round off the corners of your popcorn scraper with a file, sander or an electric grinder so your scraper won’t gouge your ceiling and leave you with dozens of ceiling wounds to repair.
- Wet your ceiling using a garden pump sprayer. For easier scraping and minimal dust, use a garden pump sprayer to mist the ceiling and let it soak in for about 15 minutes before scraping. Only give it a light misting since too much water could damage the drywall or loosen the joint tape. If the texture hasn’t softened after 15 minutes or so, spray it again and wait another 10 to 15 minutes.
If the texture still hasn’t softened, it might be painted, or paint might have been mixed into the texture before application. In either case, water won’t easily penetrate. If the texture is painted, you might be able to dry-scrape it first to expose some of the unpainted texture and follow up with wet scraping. If the texture has paint mixed in, you might have to dry-scrape the whole ceiling or cover it up with drywall or T&G boards. - Work in small sections. Only spray and scrape a small area at a time — an area no larger than 4 x 4 ft. If you work too large of an area at once, the popcorn might dry before you have time to scrape it off. If that happens, respray the area and wait another 10 to 15 minutes before scraping.
- Tame the mess with a mud pan. Catch the wet popcorn before it hits the floor with a mud pan – the kind used for holding joint compound. That way, you’re not tracking a mess all over the place. Use the edge of the pan to clean off your scraper when it gets loaded up with wet popcorn.
- Sand. Scraping alone won’t leave you with a perfectly smooth, paint-ready ceiling. At a minimum, sanding will be necessary to smooth out small dings and gouges. See ‘Preparing Your Ceiling for Paint’.
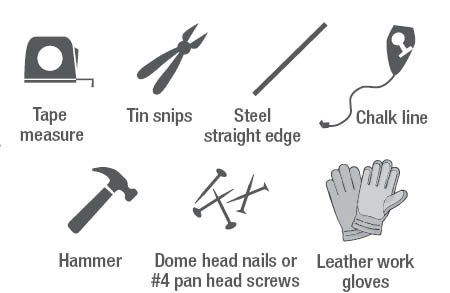
Glue-Up Ceiling Installation
Tools and Items You Will Need:

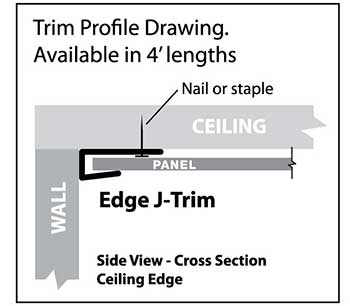
Trim Installation Tips
If Edge J-trims were purchased for finishing off your ceiling edges, you can attach the trim to the ceiling panels or to the ceiling along the perimeter, before installing the ceiling panels. If applying the trim to perimeter of ceiling first, the trim can be bonded to the ceiling, using your product manufacturer’s recommended adhesive, by applying a 1/8″ bead of to the back of the trim and pressing firmly on to the ceiling. Nails or staples can be used to tack trim in place until adhesive is cured.
Preparation
- Clean surfaces. Before starting, make sure all surfaces are clean, dry, flat, smooth, and free from dust, grease, etc. Lightly sand any glossy surfaces to remove sheen.
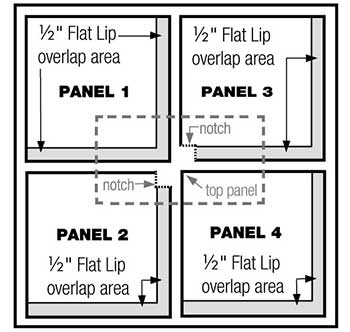
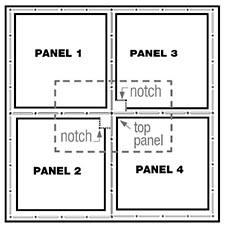
- Understand the overlap feature. Prior to installation, it is important to understand the overlap feature of each panel. Each panel has two 1/2″ flat lips for overlapping. Arrange all panels this way so additional panels can be added to the top or right side of any panel.
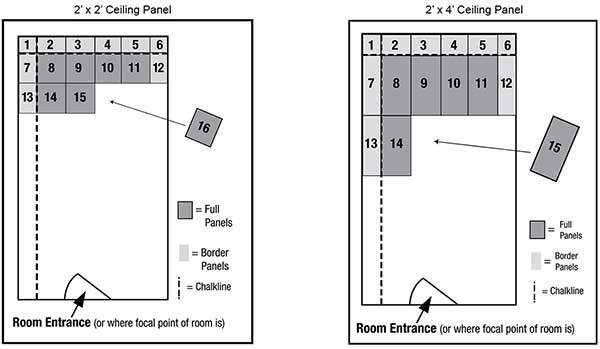
- Where 4 panels intersect. When overlapping 4 panels, it is necessary to cut a 1/2″ notch in panels 2 and 3 to avoid an overlap buildup that causes a “bump.” (Applies to 2′ x 2′ only. See drawing below)
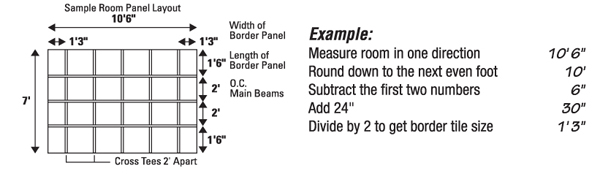
- Determine the room layout. Map your ceiling on graph paper before beginning installation. Locate and draw any light fixtures, heating vents, intersecting hallways, closets and doorways. Occasionally these features can influence starting points, tile placement and finished ceiling design.
To ensure professional looking results, the room layout should be balanced with panels centered in the room and equal size border panels used on opposite sides of the room. To find out what size to cut the border panels in one direction, see the formula below. Then repeat formula for other direction.
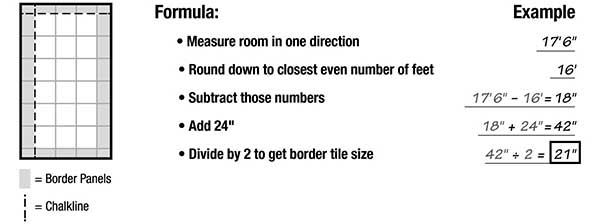
Establish your string (or chalkline) at this measurement (see above). These lines should be parallel with the walls and will help you align the first border panels. If your room is out of square, adjust accordingly.
For 2′ x 4′ ceiling panels. To find out what size to cut the border panels in the 24″ panel width direction, see the formula above. Then, repeat formula for the 48″ length direction (if using a 2×4 panel), but use 48″ instead of 24″ in the formula.
- Measure and cut border panels. Measure and cut the border panel to the previously determined size. After cutting the panel and before applying glue, clean the back surface of the panel by wiping with a clean cloth and rubbing alcohol. Refer to manufacturer’s directions. Use rubbing alcohol in a wellventilated area away from ignition sources.
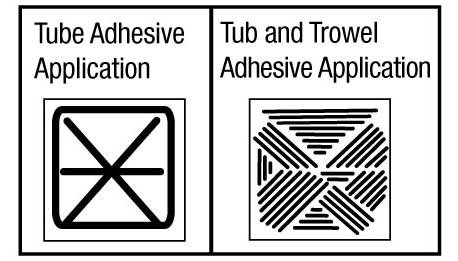
The preferred method for installing Glue-Up panels is to apply the manufacturer’s recommended adhesive directly to the back of the ceiling panels in a 1/8″ diameter bead. We recommend spreading the material out on the panel evenly with an 1/8″ trowel shown in image. Keep adhesive about 1/2″ from the outside edges to prevent leakage. Carefully read and follow manufacturer’s directions for the adhesive.
Installation
- Edge Trim. If applying to perimeter of room, install now.
- Installing first panel. If you chose to apply Edge J-trim to panel before installing, insert panel into to trim. Place this first panel at the corner farthest from the main entrance of the room
- Overlap. Overlap subsequent border panels by laying your next panel on top of the previous panel’s 1/2″ Flat Lip overlap connection.
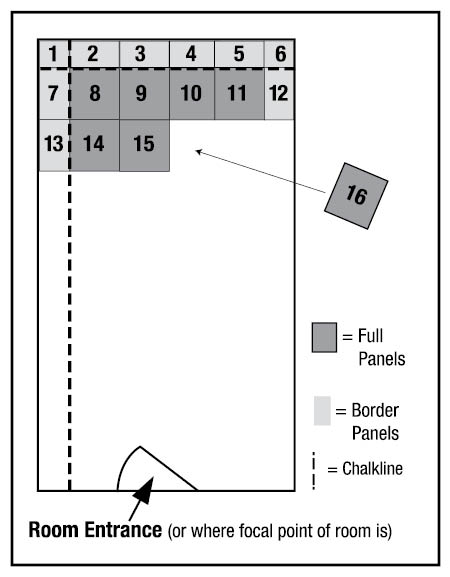
- Working in rows across the room, add panels in order according to diagram below.
Install the full panels by overlapping each new row over the previous row. Complete each row by cutting and installing the remaining border panels if applicable.
Tip: You must remove any adhesive that gets on the finished side of the panel before it dries. Using a cloth or paper towel, clean off any residue with mineral spirits
One hour after the ceiling has been completed, firmly press on ALL the ceiling panels you’ve installed to ensure proper bonding and adhesive set-up.
Once you have your ceiling installed, the panels can be cleaned with warm, soapy water. Never use abrasive cleaners, scouring pads or anything with harsh chemicals.
Installation Tip
To speed up adhesive curing time, lightly spray the adhesive with a fine mist of clean water after applying to the panel.
Nail-Up Ceiling Installation
Tools and Items You Will Need:
Preparation
- Surface preparation: This is optional, but highly recommended. Cover the area of your ceiling you intend to cover with tiles with OSB or plywood. Make sure the work area is level, flat and smooth. A 1/4″ minimum thickness is recommended. Screw OSB/plywood sheets directly over existing ceiling drywall using 3/4″ drywall screws at about 1-foot on-center. If you choose not to cover your ceiling as recommended, we suggest applying adhesive to the back side of the tile during installation to provide additional holding strength.
- Understand the overlap feature. Prior to installation, it is important to understand the overlap feature of each panel. Each panel has four 3/8″ overlap bead and button edges. When overlapping 4 panels, we suggest cutting a 3/8″ notch in panels 2 and 3 to avoid an overlap buildup that causes a “bump.” (See drawing below)
- Determine the room layout. Map your ceiling on graph paper before beginning installation. Locate and draw any light fixtures, heating vents, intersecting hallways, closets and doorways. Occasionally these features can influence starting points, tile placement and finished ceiling design. To ensure professional-looking results, the room layout should be balanced with panels centered in the room and equal-size border panels used on opposite sides of the room. To determine what size to cut the border panels in one paralleled direction, see the formula below. Then repeat formula for other parallel direction.
 Establish your string (or chalk line) at this measurement (see above). These lines should be parallel to the walls and will help you align the first border panels. If your room is out of alignment, adjust accordingly. Measure and cut the border panel to the previously determined size.
 Establish your string (or chalk line) at this measurement (see above). These lines should be parallel to the walls and will help you align the first border panels. If your room is out of alignment, adjust accordingly. Measure and cut the border panel to the previously determined size.
Installation
- To install the border panels use the measurement determined previously and measure and cut panel to this size. (Caution: When cutting tin tile, be careful of sharp edges to avoid injury – wear gloves.) Place the first panel at the corner farthest from the main entrance of the room. This will ensure these items ‘lap away’ from the main entrance, or main viewing area. Nail approximately every 6″ to 12″ around the edge of the panel and in the center where the pattern allows. Hammer carefully to avoid denting the tiles. Note that two sides of the panel cannot be secured until the next tile can be placed underneath. (Tip: Inserting the nails at a slight angle will help increase pullout strength.)
- Overlap the first 3/8″ of the subsequent border panels where the overlaps align and nail as previously noted.
- Working in rows across the room, add panels in order according to diagram to the right and fasten as previously noted. Install the full panels by overlapping each new row over the previous row. Complete each row by cutting and installing the remaining border panels if applicable.
- If using optional crown molding, start at one corner of the room and install the crown molding around the perimeter of the room.
- Tap any loose seams together with a small piece of wood. If required, fill in any panel seams or crown molding seams with a clear, paintable caulk to create a smooth, tight fit.
- Clean up. Once you have your ceiling installed, the panels can be cleaned with warm, soapy water. Never use abrasive cleaners or anything with chemicals, as these may damage the finish on the panel.
Suspended Grid Installation
Room Planning – Determine the Room Layout
To ensure professional looking results, the room layout should be balanced – equal size border panels used on opposite sides of the room, as shown below. The 8′ Mains can be installed in either direction,but if 2′ x 4′ trouffer lights are being used the Mains should be installed parallel to the 4′ side of the lights.
At the finished ceiling height establish your Main dryline or chalk line at this measurement. Fasten the dryline at the desired ceiling height drop.
Repeat these same steps for Cross Tee dryline in the opposite direction. (See Tips #1 & #2)
Step 1 – Install the Wall Brackets
Snap a chalk line on the wall 15/16″ above the desired finished ceiling height. Align the wall angle so the top of the angle meets the chalk line. Using a drill with a Phillips tip, fasten the wall angle using 1″drywall screws every 16″ on-center (at the stud location). Where two angles meet at the corner they can be mitered or overlapped.
Step 2 – Install the Hanging Wires and the First Row of Mains
Starting at the intersection of the drylines, using a lag-eye, install the first hanger wire to the existing ceiling above. Working down the Main dryline install subsequent hanger wires 24″ on-center.Hanger wires should be installed across the room in subsequent rows 24″ on-center (See Tips #3 & #4).
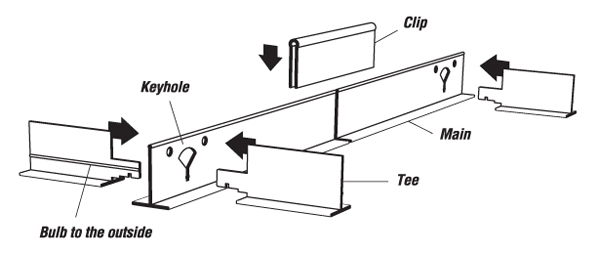
Measure and cut your first Main so the keyhole is aligned under the Cross Tee dryline. Holding so the bottom face of the Main is level with the dryline, bend and insert the hanger wire through the wire holes above the keyhole.To complete, bend and wrap the wires around them-selves three times. Install subsequent Mains by sliding the Connector Clip halfway across the next Main to secure. (Mains are sold with Connector Clips already attached.)
Cut the last Main in the row so that the Main fits tightly into the wall angle. In a similar manner, install the remaining rows of Mains 24″ on-center.
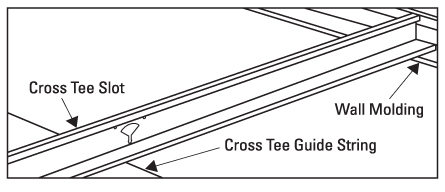
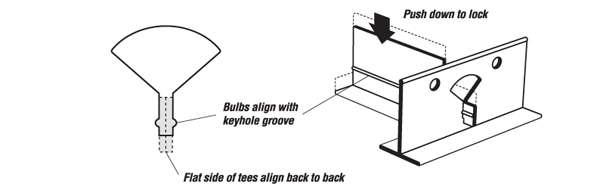
Step 3 – Installing the Cross Tees
Install the border panel Cross Tees by measuring the distance from the wall to the Main. At this dimension cut so the Cross Tee fits tightly into the wall angle. Install additional Cross Tees by snapping the tee hook into the keyhole.The bulbs on the Cross Tee should always face outward and snap into the keyhole indentation. Working across the room alternate the Cross Tees so the bulbs face opposite directions. (See Tips #5)
Step 4 – Cutting and Placing the Ceiling Panels
Beginning at the edge of the room, cut the border panels to fit accordingly. After completing the border panels insert the full panels to complete.
Installation Tips
- To ensure a perfectly level ceiling, drylines should be installed at the finished ceiling height perpendicular to the Mains every 4′ across the room.
- A minimum drop of 4″ is required. If smaller ceiling height drop is desired reference our surface mount grid system.
- When installing under joists and there is not a joist directly above the intersection, fasten to the closest joist.
When installing under a drywall ceiling locate the hidden joist for fastener attachment. - For best results the hanger wires should be installed using lag-eyes and the wires should be wrapped around themselves three times.
- When using a 2′ x 4′ tile system, install the Tees 4′ on-center by skipping every other keyhole.
Lay-In Ceiling Tile Installation
Cutting Tips
In most cases, ceiling panels will quickly and easily fit into almost any ceiling grid system. Some grids use a “stab and connect” system that may cause the corners of the tile to sit higher than the rest of the tile.
- To cut ceiling panels, mark and score the face of the tile with utility knife and snap tile at cut. A circular saw or table saw can also be used in cutting multiple tiles at once and a RotoZip or hole saw for odd sizes, shapes and circular holes – like sprinkler heads or can lights. You may also use a metal angle ruler to score and then snap the tile.
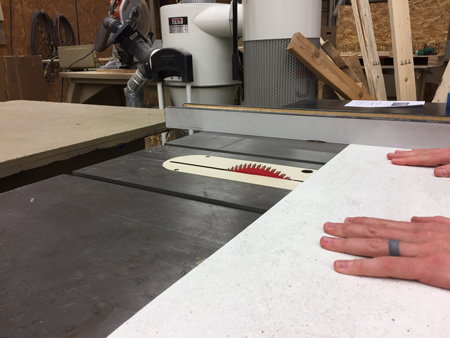
- Use a table saw or circular saw with a fine-tooth, paneling or finish blade to achieve the cleanest cut.
- When cutting the tile, place the back of the tile toward the saw to prevent scratching to the room-facing side of the tile, as shown below.

- Press the tile flat while cutting to prevent chipping.
Installation Tips
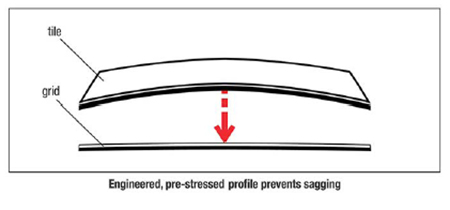
Install tiles into the ceiling grid with the pre-stressed arch facing upward. Tiles will relax into a flat position. Some ceiling tiles can be installed in front of existing tiles to reduce installation time.
Maintenance Tips
- A mild soap and water solution will work well to clean most ceiling panels as do most household cleaners. Be sure to check your ceiling tile manufacturer’s recommended cleaning method before cleaning.
- To prevent ceiling tiles from moving due to significant updrafts, optional hold-down clips may be used for drafty areas or uneven grid systems.